I knit a 2 by 2 ribbing, which is K2 P2 for at least an inch sometimes 2 inches, but usually just an inch because I don't care for knitting and purling back and forth.
I knit until my hat length measures 7 inches or so. You need at least 7 inches to make this work. I wouldn't do more than 7 1/2 so your hat isn't a monster size.

Once you reach 7 inches in length put a stitch marker every 16 stitches and decrease every row...

Until you have 10 loops between markers. For my gauage 6 rows equals an inch. This will make the hat height 8 inches after gathering the top.

For good measure and to accommodate for the gather at the top I decrease an additional 2 rows leaving 8 loops between markers. This seems to be my max on using circulars and decreasing. I have to keep moving the yarn and it can get tedious but I can do it. I also knit one stitch after my beginning stitch marker. Just by choice.

Your hat should measure between 8 inches and 8 1/4 inches. I think the extra quarter of an inch accommodates for the gathering at the top. DO NOT remove your needles yet.

Cut your tail about 12-18 inches long and thread on your sewing needle. Start with the next loop after your last knit and slide your needle under your needle to pick up the loops.

Once you have the loops on the yarn tail you can carefully pull the knitting needle out of those loops only. Continue to run your needle around in the loops and removing the knitting needle carefully until all loops are on the yarn. I always go 1 loop after the last one on the needle with my yarn tail. By choice.

Pull the yarn tail tight to close up the hole.

Sew across the gathered hole back and forth several times.
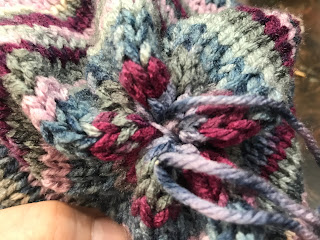
Push your sewing needle down into the center of the "hole" and stitch across the inside a few times before knotting off (just like in regular needle and thread sewing).

Run your tail down through the back loops of your hat. Check to make sure it isn't showing on the front. Cut your remaining tail.

Sew in your beginning tail at the ribbing.

It wasn't really necessary here but if you have a gap or little hole from joining your in the round. Now is the time to fix that. Go into the stitch to the right of your tail and

back into the loop to the left of the loop you just went into.

Tie off the tail like you did for the top of the hat and run the needle up the back side of the first knit of the ribbing. Snip your tail.

Here's your finished hat....Non DPN finish.

My finished hat measured right at 8 1/4 inches. That covers just past the bottom of my ears. This is how I like my hats to fit.

No comments:
Post a Comment
Thank you for leaving me a comment! I love reading them!